Tuesday, March 22, 2011

Project CB160 - Wheels and Tires

Cleaning your vintage wheels the right way includes most, if not all of what you are about to read. This includes taking apart the wheel completely separating the rim, spokes and hub. Start out by glass bead blasting the inside and center surfaces of the hub to clean them up. You could blast the outside also to remove the factory clear coat, but that could get costly. Instead, wet sand the really rough areas with fine grit emery cloth or if it's not that bad, polish using the aggressive ebony compound. Then move on to the brown tripoly compound with a tight spiral sewn buffing wheel. The next step is to use a white(fine) polishing compound with a loose cloth buffing wheel. Finally, clean and even the finish by hand polishing with some Mother's aluminum polish.

After the spokes and rim have been thoroughly cleaned, start to lace the wheel. On your vintage wheel, in most cases, you will see some slight wear marks from where the spokes were originally. this will help you place the outside spokes where they were prior to cleaning. String all of the outside spokes, then all of the inside spokes on one side of the hub first. Place the rim over the top and begin to thread a few of the nipples through the rim onto the spokes. Flip over the wheel and do the same to the other side. You will have to loosen and tighten spokes in order to get all of the spokes strung evenly. After all of the nipples are threaded hand tight, try to evenly tighten the spokes with a wrench. Test the spokes by tapping them with a wrench as they all should produce about the same tone if they are under the same tension. This part takes a while. After you've finished up, bring it to a local shop for truing and a once over.

The tires that will be mounted on the rims are some Michelin Gazelle M62's. 18" x 2.75" front and rear will cost you about $24 a piece.

Typical oxidized finish followed by Atypical mirror finish:


Monday, March 21, 2011

Deathtrap opening party

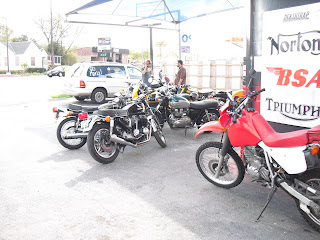
Deathtrap cycles, Austin's foremost experts on all things two wheeled and British, had a get together last weekend. Deathtrap had bands, food, booze and plenty of bikes to gawk at. Best of all, it was far enough away from the madness of SXSW to take a breath and relax. Most conversation centered around the F1 track opening soon here in Austin. Specifically, the lovely idea of getting some track time in during the off season. The plan is to get a bunch of folks to buy single cylinder bikes under 500 cc's with leathers and try to keep the budget around 3000 bucks per racer. Real racing on a real track with real motorcycle fans. Awesome. Keep in mind this is a long term goal, but I'll keep you posted.


Project CB160 - Powder coated frame

Lookin gooood! The frame, center stand and swing arm came back from the powder coater and they look flawless. The stock look is the goal in this case so a black semi-gloss color was used. Not too shabby.

Honorable mentions...

SXSW wasn't all bad though... Peelander Z from Japan was totally crazy. Costumes, synchronised dances, crowd participation and a less than stellar grasp of the english language made them one of the coolest bands to see. Deer Tick sounded great as well. When bands sound as good, if not better live than they do on their albums, you know you've got something special.


SXSW is over...thank goodness.

That's right, another sxsw has come and gone, leaving behind the usual mountains of garbage all over Austin. It's funny that now as a local, I find that the festival has lost a bit of it's luster. Perhaps sxsw has in some ways outgrown Austin, but years ago, it seemed to be less congested, less expensive and more fun. I at least remember being able to pay cash to get into a show or two. Also, the drunken show goers that in the past only made me laugh, have now become truly irritating. Specifically, because one of them either kicked over or backed their truck into my beautiful cb750 on saturday night. The mighty 750 fell sometime between 2 and 9 am without a single witness having seen the tragedy. After questioning my neighbors at the apartment complex, one thing all of the stoners can agree on, it was a total drag man. Miraculously, the bike came out of this mess with relatively no damage; slightly bent bars, a few scrapes on the exhaust, a destroyed stock rear blinker, a tweaked rear brake lever and a mutilated foot peg. It could have been a lot worse, but boy does it sting.


Sunday, March 6, 2011

Project Blue Basketcase - xs400 Meet Your Maker

Just some self aggrandising pictures of me working on the 400. I was able to get the electrical sorted out, eliminating all the unnecessary bits. The seat, including the frame and upholstery is next on the list. I'll be taking measurements tomorrow and with any luck, I'll have the seat pan set by the end of the week. Oil, gas and kicking on Wednesday. It wont be long now....

Plus, i put the wiring diagram I used on the bottom. It should work for the CDI model xs400s regardless of version. Trust me, you'll need it eventually.


Thursday, March 3, 2011

Project Blue Basketcase - xs400 - Update 3

Header wrap is good for a lot of things. Specifically, to cover up shitty looking pipes that might have been butchered by the previous owner of your project bike. I wrapped the headers that came with the 400 in a titanium colored exhaust wrap. The whole process was pretty much painless and thankfully allowed the current exhaust to be salvaged. I literally get an instant head ache when I try to figure out what the guys that had the bike last were thinking. Good news is, it's basically ready to be gassed up and kicked over...fingers crossed everybody. I have all necessary electrics working and the mess of wires is ready to be wrapped. Also, I got back the rear wheel with the new tire mounted to it. I went with a OEM looking Duro(cheap) and went slightly over sized. Plenty of room to accommodate the 400/18 rear tire.


Anyways, if you decide to wrap the headers on your bike make sure to soak the wrap in water before you start applying the tape to the header. Start wraping the header from rear of the pipe to the front. That way, it protects itself all the way down the header. Also, try to make it tight as you evenly wrap it. That way, when the wrap drys, it will tighten even more and last you longer.